 Skip to content
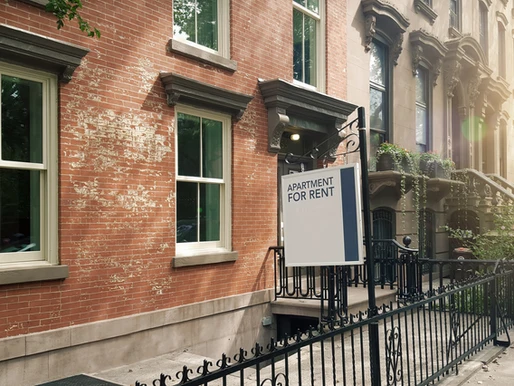
Introduction: Why San Antonio Real Estate Photography Matters
In a competitive market like San Antonio, where search volume for “homes for sale” peaks during spring and summer, high-quality San Antonio real estate photography isn’t just a nice-to-have it’s essential. Listings with professional images receive up to 61% more clicks and sell 32% faster than those without. Whether you’re a real estate agent showcasing Alamo Heights bungalows or a homeowner marketing your historic King William District property, avoiding common photography mistakes ensures your visuals attract and convert—more potential buyers.
Mistake #1: Poor Lighting & How to Fix It

The Pitfall
Relying solely on unbalanced natural light can create blown-out windows, deep shadows, and inconsistent color casts. Incorrect white balance leaves rooms looking cold or overly warm, misleading viewers.
Pro Tips for Flawless Light
-
Balance Natural & Artificial: Combine window light with off-camera strobes or continuous LEDs. Aim for a 2:1 ratio (key light twice as bright as fill) to maintain depth without harsh contrast.
-
Golden Hour Doesn’t Always Work Indoors: While exterior shots benefit from dawn or dusk warmth, interior golden-hour light can be too directional. Instead, use HDR bracketing (3–5 exposures) to merge correctly lit highlights and shadows.
-
Custom White Balance: Always set a one-shot WB using a gray card in each room—especially critical for kitchens with stainless steel or rooms with mixed daylight and tungsten.
-
Use Light Modifiers: Softboxes, diffusion panels, and bounce cards tame harsh sunlight and distribute light evenly, giving your San Antonio real estate photography a polished, magazine-worthy look.
Mistake #2: Neglecting Composition & Perspective
The Pitfall
Wide-angle lenses can exaggerate room dimensions—great for small spaces but disastrous when the horizon line tilts or verticals bow unnaturally.
Pro Tips for Perfect Framing
-
Level Your Camera: Use a tripod with a built-in bubble level to keep verticals straight and doors/windows true.
-
Eye-Level & Corner Shots: Shoot at 4–5 feet high in corners to capture depth and allow rooms to unfold naturally. Avoid shooting from hip or ceiling height.
-
Declutter & Stage: Remove personal items and arrange furniture to create clear sightlines. A well-staged dining room or living area shows potential uses of the space.
-
Grid & Rule of Thirds: Enable your camera’s grid overlay—place key lines (like countertops or window sills) along the thirds for balanced, professional San Antonio real estate photography compositions.
Mistake #3: Over-Investing in Gear Too Soon
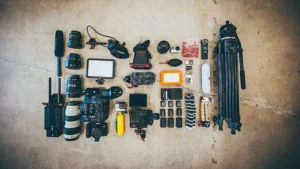
The Pitfall
Beginners often equate success with high-end camera bodies or exotic tilt-shift lenses, overlooking fundamental skills.
Pro Tips for Smart Equipment Choices
-
Start with a Versatile Kit: A full-frame DSLR or mirrorless camera paired with a reliable 16–35mm f/4 lens handles 90% of property needs.
-
Invest in Quality Tripod & Head: Stability is king—crisp, shake-free images are more important than megapixels.
-
Upgrade Gradually: Once you master composition and lighting, consider specialized gear: a tilt-shift lens for perfect perspective control or portable Io-light panels for consistent color.
-
Software Over Hardware: Budget for a robust editing suite (Lightroom, PTGui for panoramas) that corrects exposure, perspective, and color faster than buying new cameras.
Mistake #4: Perfectionism & Workflow Bottlenecks
The Pitfall
Obsessing over tiny dust spots, minute lens flares, or endless retouching kills productivity and delays delivery.
Pro Tips for Efficient Editing
-
Set Time Limits: Allocate no more than 5 minutes per image for spot-removal and 2 minutes for exposure/perspective fixes.
-
Use Batch Processing: Create presets for your San Antonio market—one for daylight interiors, one for twilight exteriors—and apply them uniformly.
-
Prioritize Key Shots: Edit hero images (kitchens, master bedrooms, curb appeal) first—clients care most about these.
-
Communicate Clearly: Define deliverables and revision rounds in your contract to manage client expectations and avoid scope creep.
Mistake #5: Failing to Set Realistic Client Expectations

The Pitfall
Underselling your process or overpromising turnaround times leads to rushed shoots, unhappy clients, and damaged reputation.
Pro Tips for Transparent Collaboration
-
Detailed Shot List & Moodboard: Share examples of lighting styles, staging, and final looks before the shoot. This aligns your vision with the client’s.
-
Clear Timeline & Deliverables: Outline the workflow—from shoot date to gallery review to final delivery—in your service agreement.
-
Educate Clients: Explain why you need empty countertops, open window shades, or 15 minutes per room. Understanding your approach increases buy-in.
-
Provide Interim Previews: Quick low-res proofs within 24–48 hours keep clients engaged and allow early feedback, improving satisfaction and retention.
Conclusion: Elevate Your San Antonio Real Estate Photography
Mastering San Antonio real estate photography means combining technical know-how with efficient workflows and clear client communication. By avoiding lighting blunders, perfecting composition, investing smartly in gear, managing perfectionism, and setting realistic expectations, you’ll produce sharper, more compelling property images that sell homes faster.
Ready to transform your listings?
Partner with Nitro Media Group—San Antonio’s experts in real estate photography and videography. Contact us today for a free consultation and see your listings come to life.


