Skip to content


Imagine this: a buyer scrolling through many property listings online. What catches their eye? Amazing real estate videography and photography. Today, these tools are super important for selling real estate. Did you know listings with videos get 403% more questions than those without? Also, 63% of buyers make offers after virtual tours. These facts show how video production and tours change the way homes are sold.
If you want to stand out in a tough market, learning real estate videography and photography is a must. Let’s look at how to make great videos that attract buyers and get results.
Key Takeaways
-
Real estate videos are very important. Homes with videos get 403% more questions and sell 31% quicker.
-
Use good tools. Buy quality cameras, lenses, and stabilizers to make great videos.
-
Plan your filming well. Set up homes nicely and list shots to show the best parts.
-
Add storytelling. Show special features to help buyers picture living there.
-
Think about hiring pros. Experts can make better videos and bring more buyers, especially for fancy homes.
Why Real Estate Videography is Important
How Real Estate Marketing Has Changed
Real estate marketing has changed a lot over time. Before, agents used newspaper ads and brochures to show homes. Now, the internet has made everything faster and easier. Buyers can see homes from anywhere with just a few clicks. Smartphones let people check listings anytime they want.
Digital tools like social media and websites are now must-haves. Platforms like Instagram and Facebook let you share eye-catching property videos quickly. Virtual tours and drone videos have also changed how buyers view homes. These tools let buyers explore houses without leaving their own homes.
Here’s how real estate marketing has improved:
-
Reaching more buyers through online platforms.
-
Using phones for quick property searches.
-
Social media helps grab attention fast.
-
Virtual tours give a real-life feel of homes.
-
AI tools help make smarter marketing choices.
Why Real Estate Videos Work: More Views, Interest, and Sales
Videos in real estate aren’t just cool—they’re needed. They make your listings stand out and get noticed. Videos keep people on your site longer, which helps sell homes faster.
Good videos also make buyers feel connected. They can picture themselves living in the home, which makes them act faster. Virtual tours work like open houses that are always available. Buyers can explore homes whenever they want.
Here’s why videos are powerful:
-
They help more people find your listings online.
-
They show homes in a fun and exciting way.
-
They build trust and help sell homes faster.
Proof That Video Marketing Works
The numbers prove it—videos are great for real estate. Listings with videos get 403% more questions. Homes with video tours sell 31% faster. These stats show that videos are not optional—they’re essential.
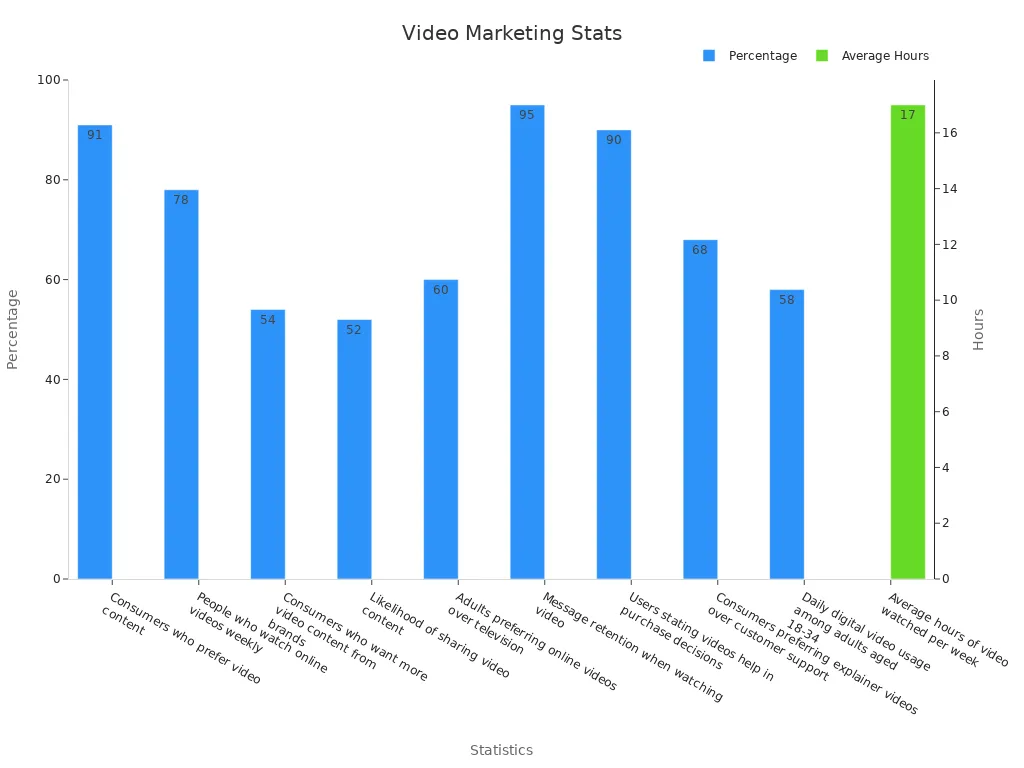
Videos also help people remember better. They remember 95% of what they see in a video but only 10% of what they read. This makes videos a great way to make your listings unforgettable.
Essential Tools for Real Estate Videography and Photography
To make great real estate videos, you need the right tools. Good equipment helps you create clear and eye-catching videos. These videos show homes in the best way possible. Let’s look at the tools you need for amazing real estate videos and photos.
Cameras: DSLR, Mirrorless, and 4K Choices
Picking the right camera is very important. A good camera makes your videos look sharp and professional. DSLR and mirrorless cameras are popular because they give great image quality. Many of these cameras can also record in 4K, which shows every detail clearly.
Here’s a simple comparison of top cameras for real estate:
| Camera Model | Autofocus Quality | Crop Factor | |
|---|---|---|---|
| Yes | Excellent (Dual Pixel) | 1.75x | |
| Yes | Good (Contrast Detect) | N/A | |
| Yes | Excellent (Dual Pixel) | 1.75x |
Think about what you need when picking a camera. For walkthroughs, good autofocus is important. For wide shots, a full-frame sensor works best. If you want super-clear videos, choose a 4K camera. These features will make your videos stand out.
Lenses: Wide-Angle and Zoom Types
The lens is just as important as the camera. Wide-angle lenses are great for showing more of a room in one shot. They make spaces look bigger and more open. Zoom lenses are flexible and save time. You can zoom in on details without changing lenses.
Here’s why these lenses are helpful:
Wide-angle lenses show big rooms and layouts well.
🔹 Canon RF 15-35mm f/2.8L IS USM – Ideal for full-frame Canon mirrorless cameras, this lens captures expansive interiors with sharpness and clarity.
🔹 Sigma 16mm f/1.4 DC DN – Great for APS-C Sony and Canon mirrorless users, perfect for real estate agents filming in tight spaces.
Zoom lenses focus on details like fireplaces or special designs.
🔹 Tamron 28-75mm f/2.8 Di III VXD G2 – For Sony mirrorless cameras, it gives a crisp zoom range with edge-to-edge sharpness, excellent for highlighting unique features.
🔹 Canon EF-S 18-135mm f/3.5-5.6 IS USM – Designed for Canon crop-sensor DSLRs, perfect for wide to medium zoom coverage in property tours.
For full-frame cameras, use lenses with 16-35mm focal lengths. For crop-sensor cameras, try 10-22mm lenses.
🔹 Sony FE 16-35mm f/2.8 GM – A premium wide-angle lens ideal for full-frame Sony shooters.
🔹 Canon EF-S 10-22mm f/3.5-4.5 USM – Popular for Canon APS-C DSLRs, giving wide coverage for tight interiors.
Features like image stabilization help in low light, making shots look better.
🔹 Look for lenses with IS (Image Stabilization) or OSS (Optical SteadyShot) — such as the Canon RF 24-105mm f/4L IS USM or Sony E 18-135mm f/3.5-5.6 OSS. These reduce camera shake, especially helpful when shooting handheld in dimly lit interiors.
Whether it’s a cozy room or a big yard, the right lens helps tell the home’s story.
Stabilization Tools: Tripods, Gimbals, and Drones
Stabilization tools make your videos smooth and professional. Shaky videos can distract buyers, so these tools are very useful.
Here’s a quick look at stabilization tools:
| Tool Type | Key Features | Benefits |
|---|---|---|
| Gimbals | Great for walkthroughs, reduces shake by 96% | |
| Tripods | Keeps camera steady | Sharp shots, holds heavy cameras |
| Sliders | Smooth side-to-side movement | Adds cinematic style, creative angles |
Gimbals are great for moving shots. They keep the camera steady while walking through a home.
🔹 DJI Ronin RS 4 Pro – Lightweight and powerful, ideal for mirrorless cameras and real estate walkthroughs with buttery smooth motion.
🔹 Zhiyun Weebill 3 – Compact, ergonomic, and supports heavier payloads for DSLR users needing high stabilization on the go.
Tripods are perfect for still shots. They hold the camera steady for clear and well-framed pictures.
🔹 Manfrotto MT190XPRO4 Aluminum Tripod – Professional-grade tripod with quick setup and rock-solid stability for crisp interior shots.
🔹 JOBY GorillaPod 5K Kit – Great for quick setups in tight spaces or uneven surfaces, perfect for flexible framing on the fly.
Drones give amazing aerial views. They show the property and its surroundings from above.
🔹 DJI Mavic 3 Pro – Industry-leading drone with Hasselblad camera and multi-directional obstacle sensing, ideal for cinematic aerial footage.
🔹 Autel Robotics EVO Lite+ – Offers a 1-inch sensor for sharp HDR video, great alternative for real estate professionals needing top-tier drone visuals.
Using these tools makes your videos look better and more appealing to buyers.
Lighting Equipment: LED Panels, Softboxes, and Natural Light
Lighting is key to making great real estate videos. It’s not just about brightness—it sets the mood and shows off the home’s best parts. You need to mix natural and artificial light for the best results.
Why Lighting is Important in Real Estate Videos
Good lighting makes your videos look professional and welcoming. It removes shadows, brightens colors, and makes rooms feel bigger. Whether it’s a small living room or a big yard, the right lighting changes how buyers see the property.
Here’s a simple guide to lighting techniques and their uses:
| Lighting Type | What It Does |
|---|---|
| Artificial Light | Gives control, great for indoor or night shots. |
| Natural Light | Free and soft; best near windows in daylight. |
| Soft Light | Reduces shadows, smooths textures; use diffusers. |
| Hard Light | Adds sharp shadows, highlights details. |
| Front Lighting | Even light, good for clear shots. |
| Side Lighting | Adds depth, shows textures. |
| Backlighting | Creates outlines or modern looks. |
| Color Temperature | Warm light (3000K) feels cozy; cool light (5500K) is crisp. |
| Modifiers | Softboxes spread light; reflectors fill shadows. |
Tools You’ll Need
-
LED Panels: These are easy to carry and adjust. They brighten dark areas and let you change color tones.
🔹 Neewer 660 LED Video Light Kit – Bi-color lights with adjustable brightness and temperature, ideal for lighting up interior spaces on shoots.
🔹 Aputure Amaran 200x S – High-performance LED with professional color accuracy and mobile app control, perfect for real estate scenes needing precise lighting.
Softboxes: These spread light evenly. They soften shadows and make spaces look cozy.
🔹 Godox 24″x36″ Softbox with Bowens Mount – Great for wide, diffused lighting over furniture or tight rooms.
🔹 Amaran Light Box 30120 Softbox – Easy setup for multi-point lighting; perfect for larger properties or staged walkthroughs.
Natural Light: Sunlight is free and beautiful. Shoot near windows during early morning or late afternoon for a warm glow.
🔹 Use a 5-in-1 Reflector Kit (like Neewer’s 43″) to bounce natural light and control shadows near windows.
💡 Pro Tip: Mix sunlight with LED panels for balance. Use softboxes to soften harsh sunlight.
Audio Gear: External Microphones and Windscreens
Great visuals grab attention, but clear sound keeps viewers interested. Bad audio can ruin even the best video. Imagine a walkthrough with muffled voices or loud wind—it’s a dealbreaker for buyers.
Why Good Audio Matters
Clear sound helps buyers hear property details. Background noise or unclear audio makes videos seem unprofessional. The right gear ensures your message is heard clearly.
Wind and rain can ruin audio quality. Windscreens cut wind noise by 20-30 dB. Rain can damage sound if the windscreen gets wet. Use windjammers and pop filters to block unwanted noise.
Must-Have Audio Gear
-
External Microphones: Built-in mics pick up too much noise. Use a shotgun or clip-on mic for clear sound.
🔹 Rode Wireless GO II – A top choice for real estate walkthroughs and interviews, offering wireless clip-on mics with crisp audio and onboard recording.
🔹 Deity V-Mic D4 DUO – Compact dual-capsule shotgun mic perfect for mirrorless cameras, capturing directional sound with minimal background noise.
🔹 Sennheiser MKE 400 (2nd Gen)– Lightweight shotgun mic with built-in wind protection and headphone monitoring, ideal for solo creators.
Windscreens: These block wind noise during outdoor shoots.
🔹 Rode DeadCat VMP+ – A furry windscreen for shotgun mics that drastically reduces wind interference, perfect for exterior property shots.
🔹 Movo WS1 Furry Windscreen Pack – A budget-friendly option that fits a variety of mic sizes for versatile field use.
Pop Filters: These reduce popping sounds in voiceovers for smoother audio.
🔹 Aokeo Professional Pop Filter – A go-to filter for studio voiceovers, reducing harsh plosives when recording narration for listing videos.
🔹 Blue Compass Boom Arm + Pop Filter Kit – A clean, professional setup for real estate agents recording voiceovers at home or in-studio.
🎙️ Pro Tip: Test your audio before filming. Record a short clip to check for noise.
Extra Gear: Memory Cards, Storage, and Editing Software
After filming, you need tools to save and edit your work. Losing files or running out of space can ruin your shoot, so be prepared.
Memory Cards: Use fast, large cards for 4K videos. Pick ones with at least 128GB and high write speeds.
🔹 SanDisk Extreme Pro 128GB UHS-I U3 V30 – Perfect for 4K real estate video recording with up to 170MB/s read and 90MB/s write speeds.
🔹 Lexar Professional 2000x SDXC UHS-II 128GB – Ultra-fast for high-bitrate video capture with transfer speeds up to 300MB/s.
Solid-State Drives (SSDs): These are fast and great for editing. Get at least 1TB for smooth playback.
🔹 Samsung T7 Shield 1TB Portable SSD – Rugged and reliable, ideal for on-the-go editing with read/write speeds up to 1050MB/s.
🔹 SanDisk Extreme PRO Portable SSD 2TB – Excellent for real estate teams needing high-capacity, high-speed external storage.
Hard Disk Drives (HDDs): These are cheaper and good for storing raw footage. Look for 4TB or more.
🔹 WD 4TB My Passport Portable HDD – Affordable and compact, great for archiving completed real estate projects.
🔹 Seagate Backup Plus Hub 8TB – Extra storage with built-in USB ports, perfect for backing up large raw video libraries.
Network-Attached Storage (NAS): Share files easily with your team using NAS devices.
🔹 Synology DS220+ NAS – A two-bay NAS solution ideal for creative teams, offering fast file sharing and remote access.
🔹 QNAP TS-264-8G – Robust NAS for real estate media teams, supporting 4K video streaming, file syncing, and team collaboration.
Editing Software
Editing turns raw clips into polished videos. Choose software that fits your skills:
-
Adobe Premiere Pro: Advanced tools for color, effects, and transitions.
-
Final Cut Pro: Easy to use for Mac users with strong features.
-
DaVinci Resolve: Great for color correction and making videos pop.
🖥️ Pro Tip: Follow the 3-2-1 rule—keep three copies of your files, store them on two devices, and keep one copy in a different place. This keeps your work safe.
Pre-Shoot Preparation for Real Estate Videos
Property Staging: Tidying Up and Making Spaces Look Great
Before filming, get the property ready. Staging is key in real estate videography. A clean and neat space helps buyers focus on the home. Remove personal items, extra furniture, and anything distracting. Think of it as setting up a blank space where buyers can picture living.
After tidying up, make the space more appealing. Add fresh flowers, arrange furniture to show the room’s layout, and use simple decor to make it welcoming. These small changes can make your videos look more professional and inviting.
Pro Tip: Clean windows and shiny floors make a big difference. These details help your videos stand out.
Planning the Shoot: Listing Shots and Highlighting Best Features
Planning ahead makes filming easier. Start by making a shot list. This is a checklist of angles and features to capture. Focus on what makes the property special. Is it the big kitchen, cozy fireplace, or pretty backyard? Show these in your video.
Here’s a simple checklist to help you plan:
| Step | What to Do |
|---|---|
| Talk with Clients | Discuss styles and ideas for the video. |
| Write a Script | Plan what the video will say and show. |
| Create a Storyboard | Sketch out scenes and transitions. |
| Check the Location | Make sure it’s easy to access and has no issues. |
| Prepare Equipment | Check cameras, lights, and microphones. |
| Set a Schedule | Plan enough time for each scene. |
| Have a Backup Plan | Be ready for problems like bad weather or tech issues. |
Planning saves time and helps you capture the property’s best parts.
Timing and Lighting Tips for Better Videos
Good timing and lighting are very important. Natural light works best, so film during the day. Early mornings or late afternoons, called “golden hours,” give soft, warm light that looks great. For indoor shots, film near windows to use natural light.
If filming at night or in dark spaces, use LED lights or softboxes. Mix natural and artificial light for a balanced look.
-
Use sunlight for bright, cheerful shots.
-
Add lamps or lights for a cozy feel.
-
Avoid harsh shadows by using soft light.
Pro Tip: Test your lighting before filming. A quick test can prevent problems later.
Shooting Techniques for High-Quality Real Estate Videos
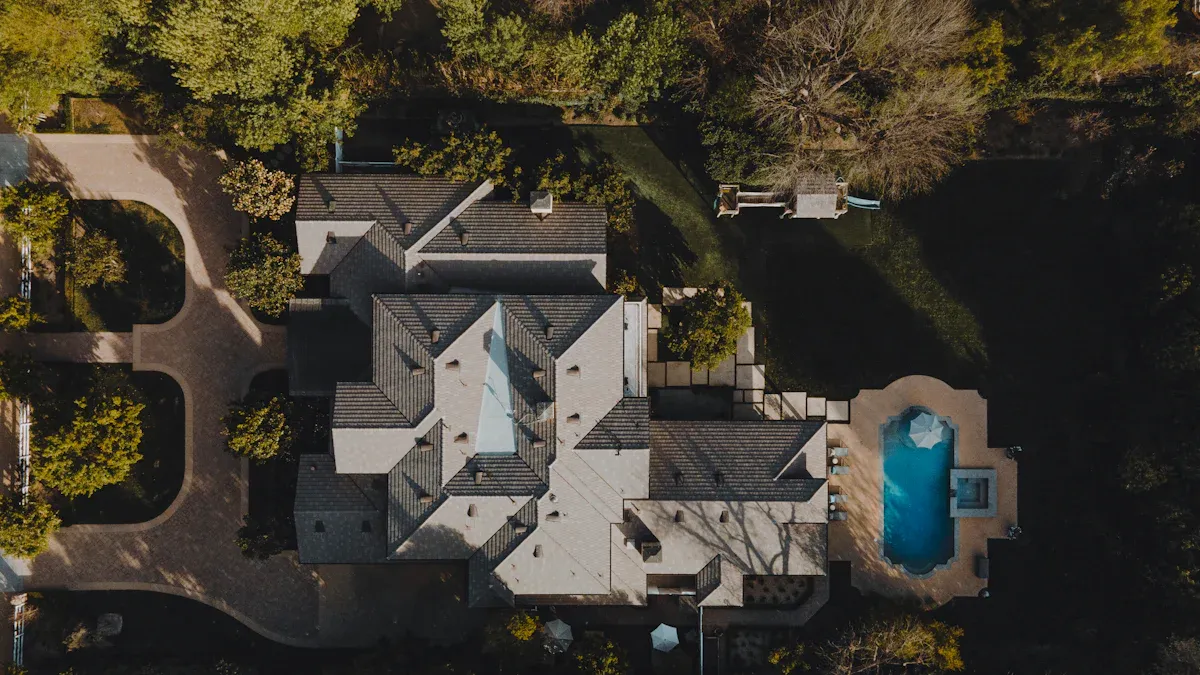
Capturing Exterior Shots: Curb Appeal and Drone Footage
First impressions are very important in real estate. The outside of a home is the first thing buyers notice. That’s why it’s key to take great exterior shots. Focus on the home’s curb appeal. Show off the yard, driveway, and unique design. Use a tripod to keep your camera steady and make the house look welcoming.
Drone footage can make your video stand out. Drones show the property from above, giving a new view. You can film the whole neighborhood, nearby parks, and even the roof and backyard. This aerial view helps buyers see the area and adds a cool, movie-like feel to your video.
Pro Tip: Film with drones during golden hour for soft, warm light. Always follow drone rules and use a licensed pilot for safety.
Interior Shots: Wide-Angle Views and Smooth Transitions
After showing the outside, it’s time to go inside. Interior shots should make rooms look bright and open. Use wide-angle lenses to capture more of the room in one shot. This makes even small spaces look bigger. Keep the camera at eye level and avoid weird angles for natural-looking shots.
Smooth transitions between rooms make your video better. A gimbal keeps the camera steady as you move through the house. This makes your video look professional and keeps viewers interested. Plan your walkthrough carefully. Start with main areas like the living room and finish with special features like a fireplace or fancy bathroom.
Pro Tip: Don’t move the camera too fast. Slow, steady shots look polished and help buyers focus on details.
Lighting and Framing Tips for Professional Results
Good lighting is super important for real estate videos. Natural light works best, so shoot during the day when the sun is bright. Open curtains to let in sunlight. For darker spots, use LED lights or softboxes to brighten the space without harsh shadows.
Framing is just as important as lighting. Center your shots to make them look balanced. Use the rule of thirds to place key features like windows or art in the right spots. This makes your video more interesting to watch.
Pro Tip: Test your lighting and framing before filming. A quick test saves time and makes your video look great.
Storytelling Through Video: Highlighting Unique Selling Points
Picture walking into a house for the first time. What stands out? Maybe it’s the warm fireplace, big kitchen, or amazing balcony view. These are the special features that make a home memorable. In real estate videography, your goal is to show these features in a way that tells a story buyers can relate to.
Why Storytelling Matters in Real Estate Videos
Storytelling isn’t just for books or movies—it’s key in real estate videos. Buyers don’t just want to see a house; they want to imagine living there. A good story helps them picture their life in the space. It builds an emotional connection, making them more likely to act.
Think of your video as a journey. Start with the outside to set the scene. Show the home’s curb appeal, neighborhood, and surroundings. Then, move inside and highlight the best parts of the home. End with a quick recap of the home’s standout features, like a fancy master bedroom or a fun backyard.
Pro Tip: Focus on lifestyle in your story. Instead of saying, “This kitchen has granite counters,” show how it’s great for family dinners or cooking fancy meals.
How to Identify Unique Selling Points
Every home has something special. Your job is to find it and make it shine. Ask yourself:
-
What makes this home different?
-
Is there a feature buyers will love, like a pool or office?
-
Does the location offer something cool, like great schools or views?
Once you know the key features, plan how to show them in your video. For example, if the backyard is amazing, film it during golden hour for soft, warm light. If it’s near a park, use drone shots to show the area.
Techniques for Telling a Story Through Video
Here’s how to turn a home into a story buyers will remember:
-
Start Strong: Grab attention fast. Use drone shots of the outside or a wide shot of the living room.
-
Keep It Flowing: Walk viewers through the home in a logical order. Start with main areas, then show bedrooms, bathrooms, and outdoor spaces.
-
Show Details: Zoom in on cool features like custom cabinets or modern appliances.
-
Add Feeling: Use music and voiceovers to set the mood. Happy music works for family homes, while soft tunes fit luxury properties.
-
End with Action: Tell viewers to schedule a showing or contact you.
Callout: Always include your contact info at the end of the video. Make it easy for buyers to reach you.
Tools to Enhance Storytelling
The right tools can make your story even better. Here are some must-haves for creating great listing videos:
| Tool | Purpose | Example Use Case |
|---|---|---|
| Drone | Aerial shots of property | Show the neighborhood and backyard |
| Gimbal | Smooth walkthroughs | Create steady transitions indoors |
| Wide-Angle Lens | Capture spacious rooms | Highlight open layouts |
| Editing Software | Add music and transitions | Create a polished final product |
🎥 Pro Tip: Use Nitro Media Group’s services to access pro tools and expert help. They can help you create a story that connects with buyers.
Examples of Storytelling in Real Estate Videos
Here’s how storytelling can make your property videos stand out:
-
Family Home: Start with kids playing outside, then show the big kitchen and cozy living room. Highlight nearby schools and parks.
-
Luxury Property: Use slow shots of the grand entrance, marble counters, and spa-like bathrooms. Add soft music for an elegant feel.
-
Vacation Home: Focus on the view. Show the sunrise over the ocean or mountains. Use drone shots to highlight the area’s beauty.
Each video should match the home’s personality. This helps buyers imagine living there.
Measuring Success: Does Your Story Work?
How can you tell if your story is effective? Check the numbers. Look at things like how long people watch your videos, how many click through, and how many leads you get. If buyers are watching longer and asking questions, your story is working.
| Metric | What It Shows | Example Tool |
|---|---|---|
| Engagement Rate | How long viewers watch | YouTube Analytics |
| Click-Through Rate | Interest in the property | MLS or social media insights |
| Leads Generated | Buyer inquiries | CRM software |
📊 Pro Tip: Work with Nitro Media Group to create videos that boost engagement and get results. Their real estate video expertise helps your listings stand out.
Post-Production and Editing for Real Estate Videos
Making great videos doesn’t end after filming. Editing is where your real estate videos truly shine. This step turns raw clips into polished videos that attract buyers. Let’s explore the tools and tips to make your property videos stand out.
Recommended Editing Software: Adobe Premiere Pro and Final Cut Pro
Picking the right editing software is very important. Adobe Premiere Pro and Final Cut Pro are top choices for editing real estate videos. They both have features to help you create professional-looking content.
-
Adobe Premiere Pro: This is great for advanced editing. It has tools for color changes, smooth transitions, and sound adjustments. You can also organize your clips easily with its timeline feature.
-
Final Cut Pro: If you use a Mac, this is a good option. It’s simple to use and offers strong editing tools. You can quickly add effects, fix lighting, and create smooth scene changes.
Both programs let you edit in 4K, making your videos look clear and modern. Whether you’re new or experienced, these tools can help you create amazing videos.
Editing Tips: Color Grading, Music, and Narration
Editing is where you can get creative. Start by adjusting colors to make your video look better. Change brightness, contrast, and saturation to highlight the home’s best parts. For example, warm colors can make a room feel cozy, while cool tones work for sleek kitchens.
Adding music can also improve your video. Pick songs that match the home’s style. A cheerful tune works for family homes, while soft music fits luxury properties. Don’t forget to add narration! A clear voice can guide viewers and point out special features like a big yard or new appliances.
Pro Tip: Keep your edits simple. Too many effects can take attention away from the home.
Optimizing Videos for Platforms: YouTube, Social Media, and MLS
After editing, it’s time to share your video. Each platform has different needs, so make sure your video fits.
-
YouTube: Use an interesting title and picture to grab attention. Add keywords like “real estate” and “home tour” in the description to help people find it.
-
Social Media: Sites like Instagram and Facebook prefer short videos. Keep them under 60 seconds and add captions for people watching without sound.
-
MLS (Multiple Listing Service): Upload clear, high-quality videos that show the home’s best features. Check the platform’s rules for file sizes.
Watching how your video performs can help you improve. Look at views, likes, and comments to see what works. Here’s a quick guide to key metrics:
| Metric | What It Shows |
|---|---|
| Views | How many times people watched your video. |
| Likes | How much viewers enjoyed your video. |
| Comments | Feedback and thoughts from viewers. |
| Demographics | Information about your audience, like where they live or their age. |
Pro Tip: Use tools to track these numbers and make your next videos even better.
Advanced Strategies for High-Converting Real Estate Videos
Using Aerial Shots for Unique Perspectives
Aerial shots can make your real estate videos amazing. They show the property from above, including its layout and surroundings. You can capture the whole neighborhood, nearby parks, or a beautiful backyard. These views help buyers understand the area better and make your listing stand out.
Drones add a movie-like feel to your videos. They don’t just show the home—they create an experience. Did you know 75% of buyers are influenced by drone visuals in virtual tours? This makes aerial shots a great way to grab attention and stay memorable.
Pro Tip: Film during golden hour for soft, warm lighting. It makes your videos look cozy and inviting.
Adding CTAs and Contact Information to Videos
Your videos should do more than just show homes—they should inspire action. Adding a call-to-action (CTA) helps guide viewers on what to do next. For example, use phrases like “Book a Tour Now” or “Call Us for Details.” A good CTA encourages buyers to take the next step.
Videos with CTAs get up to 380% more clicks than those without. Place your CTA after showing the home’s best feature or at the end of the video. Don’t forget to include your phone number or email so buyers can easily contact you.
Pro Tip: Use text on the screen or voiceovers to make your CTAs clear and easy to follow.
Leveraging Social Media and Paid Ads for Distribution
Making great videos is only part of the job. To get results, share them where buyers spend time—on social media. Platforms like Instagram, Facebook, and YouTube are perfect for showing off your listings. Short clips work well on social media, while longer tours are great for YouTube.
Paid ads can help your videos reach more people. Target specific groups, like families near schools or professionals looking for luxury homes. This way, your videos are seen by the right audience. Paid ads not only increase views but also turn viewers into buyers.
Pro Tip: Watch how your ads perform. Check views, clicks, and questions to improve your strategy.
Measuring Success: KPIs and Analytics Tools
How can you tell if your real estate videos are working? It’s not just about counting views. You need to know how your videos help get leads and sales. That’s why tracking KPIs (Key Performance Indicators) and using analytics tools is so important.
Key Metrics to Track
Watching the right numbers shows what’s good and what needs fixing. Here are the top KPIs for real estate videos:
-
Engagement Rate: This shows how long people watch your videos. A high rate means they like your content.
-
Click-Through Rate (CTR): This tracks how many people click your video links to learn more.
-
Lead Conversion Rate: This measures how many viewers become buyers or send inquiries.
-
Social Shares: This counts how often your video is shared on platforms like Instagram or Facebook. More shares mean more people see it.
-
Video Completion Rate: This tells you how many people watch your video until the end.
💡 Pro Tip: Try to get a 50% or higher completion rate. If people stop watching early, make your videos shorter or improve the beginning.
Tools to Measure Performance
You don’t have to guess how your videos are doing. Use these tools to get clear answers:
| Tool | What It Tracks | Why It’s Useful |
|---|---|---|
| YouTube Analytics | Views, watch time, and audience data | Great for checking video engagement. |
| Google Analytics | Website traffic from video links | Helps track CTR and leads. |
| Facebook Insights | Social shares and interactions | Useful for social media stats. |
| Wistia | Video heatmaps and viewer behavior | Shows where viewers lose interest. |
These tools help you see what works and improve your video strategy.
Turning Data Into Action
Once you have your data, use it to make better videos. For example, if people don’t watch for long, add drone shots or a story to keep them interested. If your CTR is low, change your video titles or thumbnails to grab attention.
🎥 Call to Action: Work with Nitro Media Group to create property videos that get results. Let’s make your real estate marketing even better!
DIY vs. Professional Videography: Which Should You Choose?
Why DIY Works: Save Money and Be Creative
If you’re new or have a small budget, DIY videography can be a good option. It’s cheaper and lets you control how your videos look. You can try out different styles, angles, and edits without spending extra money. With simple tools like a smartphone, tripod, and free editing apps, you can still make videos that look nice.
Here’s why DIY might suit you:
-
Spend less by using what you already have.
-
Be in charge of how your videos turn out.
-
Learn cool skills for making real estate videos.
But remember, DIY takes time and effort. You’ll need to plan, film, and edit everything yourself. If you’re ready to put in the work, it can be fun and rewarding.
💡 Tip: Start small. Make short, good-quality videos for Instagram or Facebook.
Why Professionals Are Better for Fancy Listings
For expensive homes or tough markets, hiring professionals is often better. They have experience, fancy tools, and know how to make your videos look amazing. Pros can show off a home’s best features and create videos that grab buyers’ attention.
Here’s what professionals offer:
-
Top-notch videos made with high-tech cameras and drones.
-
They save you time by handling all the work.
-
They know how to make videos that sell homes fast.
Did you know homes with professional videos get 400% more questions? Also, 80% of agents use drone shots to show properties. These numbers show why hiring pros is smart for luxury or special homes.
🎥 Note: Work with Nitro Media Group to make your listings shine. Their skills will help you stand out.
Things to Think About: Money, Home Type, and Quality
Deciding between DIY and hiring pros depends on a few things. First, think about your budget. DIY is cheaper, but pros give better results. Next, consider the home type. A small rental might not need drone shots, but a big fancy house probably does. Lastly, decide how polished you want your videos to be. For high-end buyers, sleek and professional videos are a must.
Here’s a simple comparison to help you choose:
| Factor | DIY | Professional |
|---|---|---|
| Cost | Cheap, basic tools | Expensive, high-quality results |
| Home Type | Small or regular homes | Fancy or unique homes |
| Time Needed | A lot (you do everything) | Little (experts handle it all) |
| Quality | Good for simple videos | Amazing for selling faster |
In the end, it depends on your goals. If you want to save money and enjoy being creative, DIY is great. But if you need polished videos that sell, hiring pros is worth it.
Top Tools for Real Estate Videography: What the Pros Use
DJI Ronin 4D: Changing How Homes Are Filmed
The DJI Ronin 4D is a powerful tool for real estate videos. It combines a high-quality camera with a built-in stabilizer. This makes it great for smooth and steady shots. You can walk through homes and still get clear, professional-looking footage. Its advanced autofocus keeps every detail sharp and easy to see.
This tool is perfect for tricky movements. Whether filming a big staircase or a small living room, it keeps your video polished. It’s ideal for creating videos that attract buyers and stand out.
Pro Tip: Use the DJI Ronin 4D with a wide-angle lens to easily show large spaces.
Sony A7iii: A Top Camera for Real Estate Videos
The Sony A7iii is loved by real estate videographers. It records in 4K, making homes look bright and detailed. Its full-frame sensor works well even in dim light, which is great for darker rooms or evening shots.
The camera’s autofocus is fast and accurate, so your shots stay clear while moving. It also has a long battery life, letting you film multiple homes without stopping. If you want high-quality videos, this camera is a great choice.
Pro Tip: Use the Sony A7iii’s S-Log mode to improve colors when editing.
Rode Wireless Go: Better Sound for Your Videos
Good sound is as important as good visuals in real estate videos. The Rode Wireless Go is a small, wireless microphone system that makes your audio clear and professional. It’s easy to use and lets you move freely while filming.
This microphone works well both indoors and outdoors. It reduces background noise, making it great for busy areas or windy days. Adding clear sound to your videos helps buyers focus on the property.
Pro Tip: Add a windscreen to the Rode Wireless Go for outdoor filming to reduce wind noise.
DJI Mavic 3: Amazing Drone for Aerial Property Videos
The DJI Mavic 3 is a top choice for real estate videos. This drone helps you capture amazing aerial views of homes and neighborhoods. It shows the property’s layout and nearby features like parks or schools. Buyers love seeing these wide views, and the Mavic 3 makes it easy.
This drone has a 4/3 CMOS Hasselblad camera for clear, colorful videos. Whether it’s a big estate or a small home with a nice yard, the Mavic 3 makes every detail look great. Its 46-minute flight time means you can film large areas without stopping. Plus, its obstacle-sensing tech keeps your shots smooth and safe.
Why are aerial views so helpful? They show things ground-level photos can’t. For example, you can highlight how close a home is to a park or waterfront. These views grab attention and help buyers imagine living there.
Here’s why the DJI Mavic 3 is great for real estate videos:
| Feature | Benefit |
|---|---|
| 4/3 CMOS Hasselblad Camera | Clear, professional-looking videos |
| 46-Minute Flight Time | Film large areas without rushing |
| Obstacle Sensing | Smooth and steady shots |
Pro Tip: Film during golden hour for soft light that makes homes look cozy.
Want to make your property videos stand out? The DJI Mavic 3 is a great tool. Work with Nitro Media Group to create videos that attract buyers!
Work with Nitro Media Group for Top-Notch Real Estate Videos
What Nitro Media Group Offers
Nitro Media Group makes amazing real estate videos that help homes stand out. They create everything from aerial views to smooth walkthroughs and polished promo videos. Using advanced tools like drones, gimbals, and 4K cameras, they make sure every video shows the property at its best.
They don’t just film—they tell a story. Their videos highlight what makes each home special, whether it’s a luxury mansion or a cozy family house. With over 400 happy clients and a near-perfect 4.99 rating, they’ve shown they can deliver great results for all kinds of properties.
💡 Tip: Nitro Media Group also offers photography and Matterport tours, making them a one-stop shop for property marketing.
Why Professional Videos Matter
Professional videos aren’t just pretty—they get results. Nitro Media Group’s videos help you attract buyers, get more leads, and sell homes faster. Here’s why their services stand out:
-
Better Visibility: High-quality videos grab attention on YouTube, Instagram, and MLS.
-
More Engagement: Buyers spend more time watching videos, increasing interest in your listings.
-
Faster Sales: Homes with pro videos get 403% more questions and sell 31% quicker.
-
Custom Content: They focus on the best features of each property to appeal to buyers.
Nitro Media Group is known for creating videos that work. Their skills in real estate videography help your listings shine and bring real results.
Steps to Start with Nitro Media Group
It’s easy to work with Nitro Media Group. Start by setting up a meeting to talk about your property and goals. They’ll guide you through every step, from planning to sharing the final video.
Here’s how it works:
-
Consultation: Share your ideas and talk about the property’s highlights.
-
Custom Plan: Get a strategy tailored to your listing.
-
Filming: Their team uses top tools to capture stunning footage.
-
Editing: Receive a polished video ready to wow buyers.
-
Sharing Tips: Learn how to post your video for the best results.
🎥 Call to Action: Want to boost your real estate marketing? Contact Nitro Media Group now to create videos that sell!
Learning real estate videography is a must today. It helps your property stand out in a crowded market. Homes with videos get more attention, rank higher, and sell quicker. Did you know 80% of people watch real estate videos weekly? Videos are a great way to show homes and make them unforgettable.
It’s time to use these tips and tools. Start by cleaning and setting up the property. Plan your shots and pick the right gear. Use drones for cool aerial views or gimbals for smooth walkthroughs. Each video you make can help you sell homes faster.
Want to improve your property marketing? Nitro Media Group can help. They make top-quality videos that attract buyers and close sales. Contact them today to begin!
FAQ
What is real estate videography, and why does it matter?
Real estate videography means making videos to show off homes. It’s important because videos catch attention, keep buyers interested, and help homes sell quicker. Good videos highlight a home’s best parts and make your listings stand out in a crowded market.
Can I use my phone to make real estate videos?
Yes, you can! Today’s smartphones have great cameras. Use a tripod or gimbal to keep the video steady. Add good lighting for a professional look. While phones are fine for simple videos, using wide-angle lenses or hiring experts can make your videos even better.
Should I add drone shots to my property videos?
Definitely! Drone shots give cool views from above. They show big yards, nearby places, or pretty scenery. Buyers love seeing the whole area, and drones make your videos more exciting and unforgettable.
How long should a real estate video be?
Keep videos short—1 to 3 minutes is best. Shorter ones are great for social media, while longer ones work for detailed tours. Focus on the home’s main features to keep viewers watching and make videos that get more questions.
Do real estate videos really help homes sell faster?
Yes! Homes with videos sell 31% faster and get 403% more questions than those without. Videos help more people see your listing, build trust, and make buyers feel connected to the home. They’re a must for today’s property marketing.
💡 Pro Tip: Work with Nitro Media Group for expert real estate videos that get results.